OpenWRT On Meraki
As a strong believer in FOSS I take what would seem ridiculous measures by others to utilise FOSS in my life where possible (this very site uses Bulma & Hugo). In many cases the FOSS version of something greatly improves the experience, there are some where it does not, this is an example with both perspectives.
OpenWRT ‘is a Linux operating system targeting embedded devices’ specifically firmware for network devices, such as the home hub, or in my case a Cisco Meraki MX60 security appliance and Cisco Meraki MR16 access point.
With great power comes great responsibility, which is why I always recommend going for a polished distribution of software, though I do still love one dev projects. OpenWRT is exactly that, a great community base with active development. I don’t need to try and keep up with all the latest security vulnerabilities, bug fixes, any other concerns. I can track the progress of the project (via a GitHub releases RSS feed), ensure I’m up to date on my devices, and report any issues I face.
Why Cisco Meraki Hardware?
Why not?
Attend a webinar and get a free kit.
“Attend a webinar and get a free kit” was part of Meraki’s marketing campaign in the early days. So I did, then the free kit mostly stayed in the box. All around me people have crazy home networks, I did feel slightly out of place, but I had no good reason to move away from the ISP provided single box. My needs were not complicated, a phone, a laptop, a PC, I don’t live in a mansion where the WiFi can’t reach distant rooms.
My Addiction
I have become addicted, addicted to Pi, it was always bound to happen, from the seeds of my life’s passion for technology and how we can use this to improve people’s lives. I owned my first Raspberry Pi for many years, similar to the Meraki, it stayed in a box unused beyond the honeymoon. More recently I’ve built a home media server (Centos + ZFS + Docker) and to control the power on/off schedule, I began using the Pi. Fast forward and I now have 6 Pis (with project ideas for many more). I upgraded the scheduler Pi as I put a few more containers on there. The other Pis are part of a Kubernetes cluster to eventually replace the standalone Pi for clustered HA workers.
I did consider using a Raspberry Pi as a router on a stick and as an AP. I’m sure I’ll explore this, even if just for fun, it’s so cool that we have the option.
Now I have many things attached, with Linux containers allowing me to deploy a vast amount of self hosted applications, I needed a way to better protect my entire network. Add to that a preparation for smart home devices (still waiting/hoping for the Mycroft II before I let a speaker loose… or maybe Almond with Home Assistant… exciting times).
Why not just run the Meraki with stock firmware?
- Where is my freedom in that?
- Freedom to do what I want.
- Freedom to define my own use cases.
- Freedom operate my life how I want it.
- I enjoy a project like this.
- To explore new ways of doing things.
- To learn how things things work under the covers.
- To play with the world around me.
- I don’t need Enterprise management.
- The changes are few and far between.
- I have 2 devices in 1 location.
- I am comfortable with under-the-hood changes & configurations.
My Journey
A Glimpse Of The End
Let’s start at the end, so you can see what you’re getting yourself into, or just where I ended up at.

OpenWRT Luci on MX60
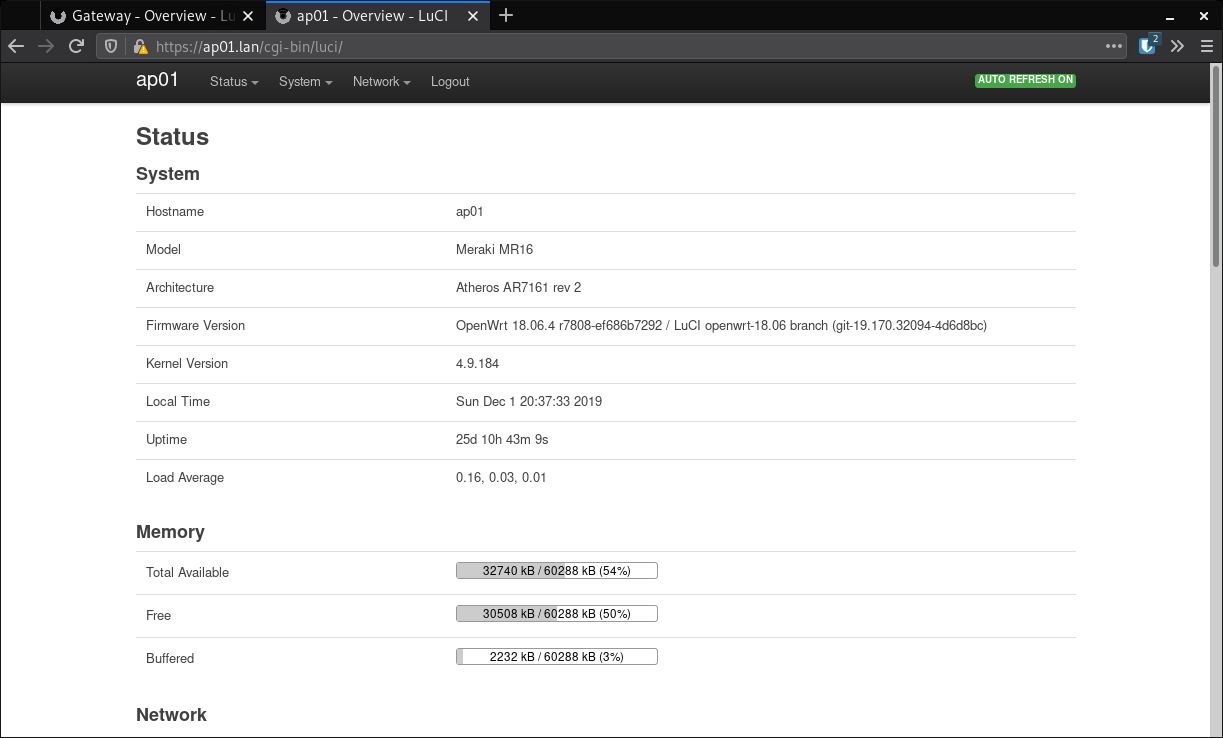
OpenWRT Luci on MR16
Both the MX60 and MR16 are running OpenWrt 18.06.4, totalling 26 days (47 at the time of writing) without reboot, and very little load (demonstrating the capability of the hardware). These systems are stable with plenty of room for growth, which in my eyes means a successful project. A huge thanks to the OpenWRT community for making this possible!
The Start
Decisions, decisions, decisions. Every journey starts with a decision, sometimes these are our own, sometimes they are made for us. My first decision was which firmware to use. As you know by now I went with OpenWRT, I like their FOSS approach, and they supported my devices. DDWRT did not, nor Tomato, and options like PFSense are a whole other kettle of fish (for x86 devices rather than embedded firmware, though I may explore this in the future).
How do I get in? Most devices have a console port, or similar service port, but these devices are not designed for end user administration. Meraki, as part of the subscription, has a SaaS management portal which covers all management needs. This portal is the only management method, this is a good reason to have a subscription, they have cloud hosting and developers bills to pay too! So there is no apparent way to locally gain access and flash the boxes. Thankfully this is covered by the devices pages above, partly, showing internal images and location of the console port.
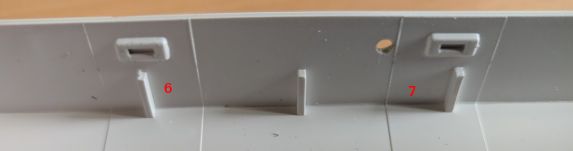
A missing piece is the screw holes, which you wouldn’t expect to be a problem, but they were a slight hiccup for myself. The MX60 came apart no problem, I have a precision screwdriver set with the Torx (star shaped) head I needed, and the bottom slid out. The MR16 however did not come apart so easily. As an AP it is designed to be in more public spaces, so a little extra ruggedness is ideal, stopping anybody from just unscrewing the top and gaining access. There are clips all around, which I discovered after making a grip and drilling out one of the clips, to avoid my steps take a look at these photos for clip locations.
MX60

Screw hole on MX60

Screw hole on MX60
MR16
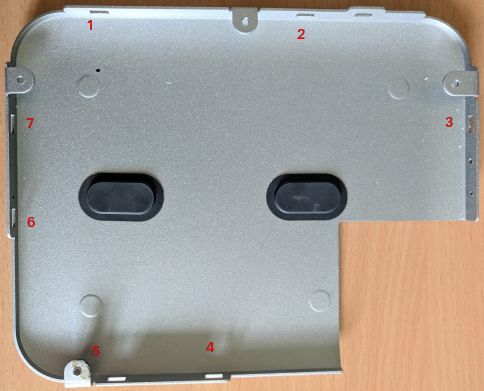
Clips on MR16 Inside Plate

Clips on MR16 Side View
Clips on MR16 Inside Cover
Once inside we get a much better look at what we’re working with. Some interesting things that stood out to me were.
APantennas appear really small.- Though I have read somewhere that a bigger antenna doesn’t always result in a bigger signal, it’s related to the signal spectrum in which you’re transmitting.
- There are no problems with signal strength, this surpasses my original
hubstrength in the farthest parts of my home. - Having seen external antennas be much larger, I expected something similar inside, but I’m not an expert in antennas in any shape or form.
- Etchings for the Wireless version of
MX60.- It’s clear that the
MX60andMX60Wshare the same components, with the W adding in a WiFi module. - This is a
Ver : 1.00board, so they knew from the start that there was to be anon-Wand aWvariant. - I did wonder if a future project could be to solder on a WiFi module, but looking at all the other chips I’d need, and possibly boot FW, I won’t be exploring this.
- It’s clear that the
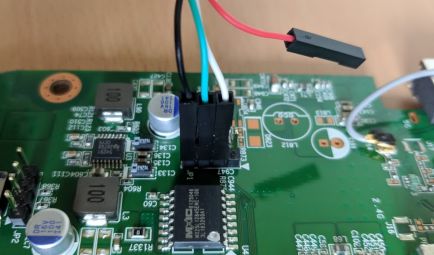
Console Port
Sticking up from both boards is 4 pins, there was multiple pin locations, but thankfully the OpenWRT devices pages had description to the correct ones.
MX60
Connect on Console (J2). P1 is closest to the H1 screw, and P4 is closest to the JTAG port. MX60 Source
MX60 Console Connection
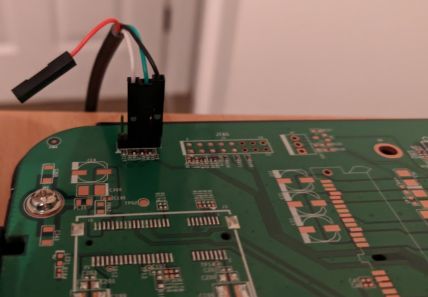
MR16
Connect on JP1 (J1 has square solder off on reverse of board). Baudrate 115200N81 MR16 Source
MR16 Console Connection
This isn’t your typical console port if you’re coming from the Cisco world of things like I am. A console port in the Cisco world is an RJ45 head, with a blue cable going to an RS232 connector, hooked into a USB adaptor to come up as a Com port on your PC. Newer models have this built in, and you just need a USB to USB Mini cable, much easier to get working.

Cisco Console Cable
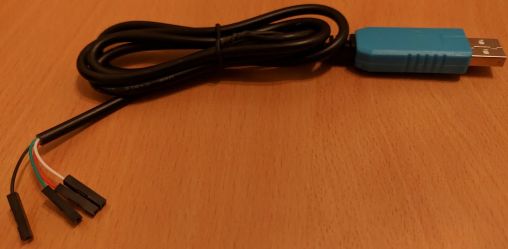
USB to TTL Serial Cable
So what do we do with 4 pins? We need a USB to TTL Serial Cable, ideally with independant pins on the end, so we can flip pins as and where needed per device. This is the exact one I got https://www.amazon.co.uk/gp/product/B01N4X3BJB, the drivers we’re already available in Linux and Windows default repos/updates. I got 2 for the possibility of embedding these, and exposing just a USB port, for easier access in the future (no need to find that cable, take the cover off, lookup the pinout). The pinout is listed in the Amazon product description. Pairing this with the OpenWRT device pages pinout information we are ‘cooking with gas’.
Line sequence defined: Red +5V, Black GND, White RXD, Green TXD
Some things to note from my experience are:
- Don’t connect the power
+5Vpin.- When connecting all the pins I couldn’t get anything back from the device. Looking at the pinout I know I need receive
RXD, transmitTXD, and have never used anything without groundGND, I questioned the power+5V. - This is a powered device, with plenty of juice, though power would make sense to me for activation of the connection and signal.
- However, when I didn’t use the power pin, rebooted, I started getting text on screen.
- When connecting all the pins I couldn’t get anything back from the device. Looking at the pinout I know I need receive
- Use the correct speed of
115200. - Hold the space key during boot.
- The boot up has a break out timer, to drop you into the console you need, this timer is 1 second.
- Rather than try and hit it, or enter characters you may want to avoid, just hold space.
- Worked every time.
The Middle
Flashing involves the overwriting of existing firmware or data, contained in EEPROM or flash memory modules present in an electronic device, with new data. This can be done to upgrade a device or to change the provider of a service associated with the function of the device Source
Flashing is frowned upon in many spaces, vendors don’t like people flashing their hardware, flashing is particularly discouraged in public places. It should go without saying that flashing will (in 99% of cases) invalidate any warranty and support you have with a vendor, but by this point you’ve opened up the device, we’re way past that.
Follow the guides on the OpenWRT device pages, they include everything you need, and is the source material I used. Some of the bumps along the road that I hit were:
- Ensure your
TFTPserver works.- I originally did all of this in Fedora Linux, which has
TFTPsupport, but the test image simply wasn’t booting on the Meraki side. - I checked my logs, the image was being accessed, I even had to update SELinux to allow access to the file. So I suspected it to be an image problem, or a device problem.
- In the end to eliminate possibilities I changed the software I was using, the whole OS in fact, by rebooting into my Windows install and using the recommended TFTP software.
- This worked. I didn’t bother trying to fix it on the Linux side, I haven’t used
TFTPfor years, and doubt I will for a long time. Once OpenWRT is up you can use more modern transfer protocols such asSCP.
- I originally did all of this in Fedora Linux, which has
- Take note of naming & IPs.
- The guides have pre-defined names and IPs, simply stick with them.
- There is no benefit in using something different, doing so means you have to double check every command there after.
- I did use different ones, as it made more sense for my setup, but I did have to restart the process a few times to compensate for the differences.
- If the image doesn’t work, flash an older one.
- It’s drilled into us to start with the latest stable, but in my scenario it simply wouldn’t work. Then I read @frtz comment and it simply made sense.
- Start with the riptidewave93 build and then simply upgrade it. Chris, aka riptidewave93, did a bunch of work on getting OpenWRT on these Meraki devices.
don’t worry about the age of riptide’s build. use it to flash OpenWrt. Then do a sysupgrade from within OpenWrt to the current release. @frtz Source
The End
You’ve seen the end, I hope your journey gets you to a working system too!
Now you have OpenWRT, you can access the WebUI, you’re ready to configure OpenWRT as you please. Having got this far I’m going to assume you already have an idea of what you want to do and are comfortable with this part. Some of the things I did and recommend were:
Your IP may differ, you configured this, change as necessary.
Create an initial backup
http://192.168.1.1/cgi-bin/luci/admin/system/flashops
Enable SSH for remote access
http://192.168.1.1/cgi-bin/luci/admin/system/admin
I recommend setting the listen interface to just the Management network interface, not the WAN:
- Doing
unspecifiedincludes the WAN, so someone from the Internet could potentiallySSHto your gateway and gain control. - Add additional Dropbear Instances if you want more interfaces.
- If you want to limit access from inside the LAN, use the firewall to restrict access to the Management network as a whole.
I recommend adding SSH keys, so you can SSH without needing passwords, and use this by default. To avoid locking yourself out, I would still keep a password auth option, but again limit the scope of systems that can access that route.
If you do expose this to the Internet then I would recommend:
- Firstly, don’t do this unless you truly understand the implications and setup.
- Change the default port number to something random.
- Do not allow password auth, or login root with password. Only allow certificate based access.
- Password protect your keys on any mobile devices you have.
- On Linux you set this up as you make the Key.
- On Android, I personally use ConnectBot, which allows password locking keys access.
- The password unlocks the key, the key authenticates, your password is never transmitted.
Learn the naming convention
The naming threw me at first, I kept doing the wrong thing, as when I read something it instantly made sense as a more traditional Cisco way of doing things. Then I had to rethink and remap the device logic in my mind to get the correct configuration.
- What they call interfaces I’d call
sub-interfacesorSVIson the CPU. - What they call switch I’d call Layer 2 interfaces.
- It made more sense to me when I realised that the switch and the CPU are different components connected together. This is more router-on-a-stick than a single device.
- So you do configure an interface on the CPU, with
sub-interfacesfor eachVLAN, and add an IP for the gateway of thatVLAN. - Then you have to configure the switch, which is a separate component, so you do have to configure the switch interface to the CPU. If you don’t tag traffic here, the CPU doesn’t see it in the right
VLAN. I tag allVLANsto the CPU.
Create a dedicated management network VLAN
Separating out management, even if it’s just the one device, allows for good control.
- To isolate management traffic from users (easier to create Firewall entries).
- To isolate problems and protect management access.
- To apply
SSHconfig unique to that interface (with the Firewall restringing access from otherVLANs)
Dedicate an OOB management port
There is no OOB management, nor easily accessible console, on these devices. With concern of locking myself out of these boxes, I tried to set it up in ways that mean I can recover quite quickly. OpenWRT has a cool option for a recovery mode, which has worked for me, but for my situation, I still had to get to the console and apply remediation changes (taking the lid off).
- Dedicate a physical interface to the
Management VLAN(discussed below). Assuming you trust people who can enter your home not to plug in a rogue device. - There is no need for DHCP etc on this interface as you can set your own static IP on a laptop if there is an issue.
- Don’t tag the traffic, so you don’t need to tag from your laptop, just allow untagged. Traffic coming in will be tagged by the switch before being passed to the CPU (if you tag all
VLANsto CPU as I do). - Now if I lock myself out, I hook a laptop into there, add a static IP and can access OpenWRT again.
Enable HTTPS
HTTPS encrypts the traffic of the web interface, which if you’re on a shared network would be advised to set up, as your login password would be transmitted in clear text. To set this up, I followed this guide by Fabian OpenWrt: Enabling HTTPS for the LuCI Web Admin Interface.
When I connect with Firefox I am presented with a warning, as the certificate isn’t a published one, it’s self-signed by OpenWRT. This is totally normal. Accept it, save it as an exception, and then you won’t be asked to validate again. If this ever does, and you have not reset your Firefox or computer, then it’s a sign that someone has either changed the certificate or is listening in to your traffic as a man-in-the-middle attack. I have not seen Chrome/Chromium save self-signed certificates and ignore them in the future.
Learn the config files
As mentioned I find the terminology a bit confusing. Additionally, flicking between pages for syncing up configuration created a bit more confusion. This is worsened by the creation of many networks in my setup.
The Luci interface is great for getting going, for viewing information, and for doing elements of configuration. Luci programs down to config files accessible via SSH. These config files are easy enough to learn, and allow you to structure them how you like, comment right next to the configuration, save and apply.
Note Luci does clean configuration changes. Humans do not. So you may bork your setup by doing a config change wrong, which you’ll have to perform appropriate recovery steps. Additionally, if you do make an easier to read config file, changes from Luci will remove all your comments and extra formatting, as the machine has no use for those.
The config file has become my preferred way of configuring the system, at least for the parts I make more changes to, and understand more. Perhaps it’s my background, perhaps it’s how I’m wired, but I’m not alone in preferring text over UIs.
My changes involve pulling the latest config file from a git repo, applying the changes I need, then running a ansible playbook to push the changes and restart the process on OpenWRT. Ansible is a bit overkill, as it just makes a backup of the existing config locally, copies over the new config, then restarts the service. But I use Ansible for other elements and this fits right in.
For an AP, use Dump AP Mode
Run the AP as just an AP if you have another router. By default OpenWRT expects to be the only box, so it is the gateway, WiFi, DNS, DHCP, etc. When we already have something doing that, and this box is just an AP, we need to tell OpenWRT.
- Mode: Access Point Source.
- This disables DHCP, DNS (I have these centrally on the
MX60, so not needed on theMR16). - I disabled the Firewall (I have
VLAN segmentationwith the firewall on theMX60). - The
APis just the bridge between the wire and radios.
What’s Next?
If you’ve made it this far I say give it a go! But do be aware of those who this will affect, who uses the network which you’re playing around with, and how will they react when you do break it first time round. Ideally you can do this alongside your existing network, then migrate over once you’re happy, that’s exactly what I did. I created a legacy VLAN and sub-int so all my old devices hooked in with no problem.
Take a look and see if your box is supported, even if it’s not a Meraki one, OpenWRT supports hundreds.
If it’s not on the list, buy a box just for this purpose, but buy something more open to running different firmware. The Meraki hardware is great, but also a pain when I need to get to the console, or if there is a flashing issue and I need to recover.
I hope this inspires your next project. Good luck, enjoy the journey!
Thanks for reading.