Webex Camera Light Automation
Everyone is using a video meeting/calling app these days. This is not new to me, I’ve been on them for close to 10 years now, so having my camera on for every meeting is the default. You may use Zoom, or Microsoft Teams, or like where I work (at the time of writing I work for Cisco) it’s Webex, so my setup is focused around that. When I have to join one of those other flavours (rarely) I revert to caveman times and turn turn on the lights manually.
I’ve recently moved home and due to the layout of my office there is a window behind me. I don’t want sacrifice elements of my office layout simply to improve the lighting on video calls, perhaps if I was a CEO, or had a massive office. So, to overcome being a silhouette rather than a person I decided to automate my office lighting to fix that problem. Now when I join a video call/meeting the lights come on so that I’m clearly visible. When the call/meeting is over they turn back off.
Tooling Used
My choice of automation hub is Home-Assistant, if that word is new to you and you’re interested in that topic, then I heavily suggest you take a look. This post won’t go into any detail of Home-Assistant, or setup, etc as there is plenty of better resources out there.
For the lighting itself I bought a pair of Philips Hue Play light bars and mounted these behind my monitor, to reflect light off of the wall, casting a soft but bright glow on my face. They come with some mounting pieces and double sided foam which should work in most situations. I instead 3D printed an angled mount to improve the light that comes back. There are many options on Thingiverse if you also have access to a 3D printer. If you don’t please don’t be put off by this, as your desk, room, wall, and monitor will all differ also..
The Philips Hue system has it’s own hub, as the devices communicate over a protocol called Zigbee, not your standard WiFi (802.11xyz). I do not have their hub as I have another Zigbee hub (Sonoff ZBBridge that I’ve flashed with Tasmota) but that shouldn’t stop you as Home-Assistant does support the Hue system.
Webex API
There are 2 components to this automation. Firstly, we need to have an entity which holds the state of whether we are on a video call/meeting or not. Secondly, we need to run an automation when the state changes. We get the information from the Webex API so there is nothing needed on my laptop or any weird hacks. With my current setup this would still trigger if I joined on my phone, or I was out of the home. To solve this we could setup automation conditionals, for when I am home (e.g. my phone is connected to WiFi) but this is outside the scope of this post.
Home-Assistant is able to get information from an API, using the HTTP REST integration, and store the result as a sensor entity for us. This is done in the yaml configuration files, performing the check every 10 seconds (configurable). But first we need to get your unique IDs, this includes your API user ID (not login ID) and Bearer token.
API User ID
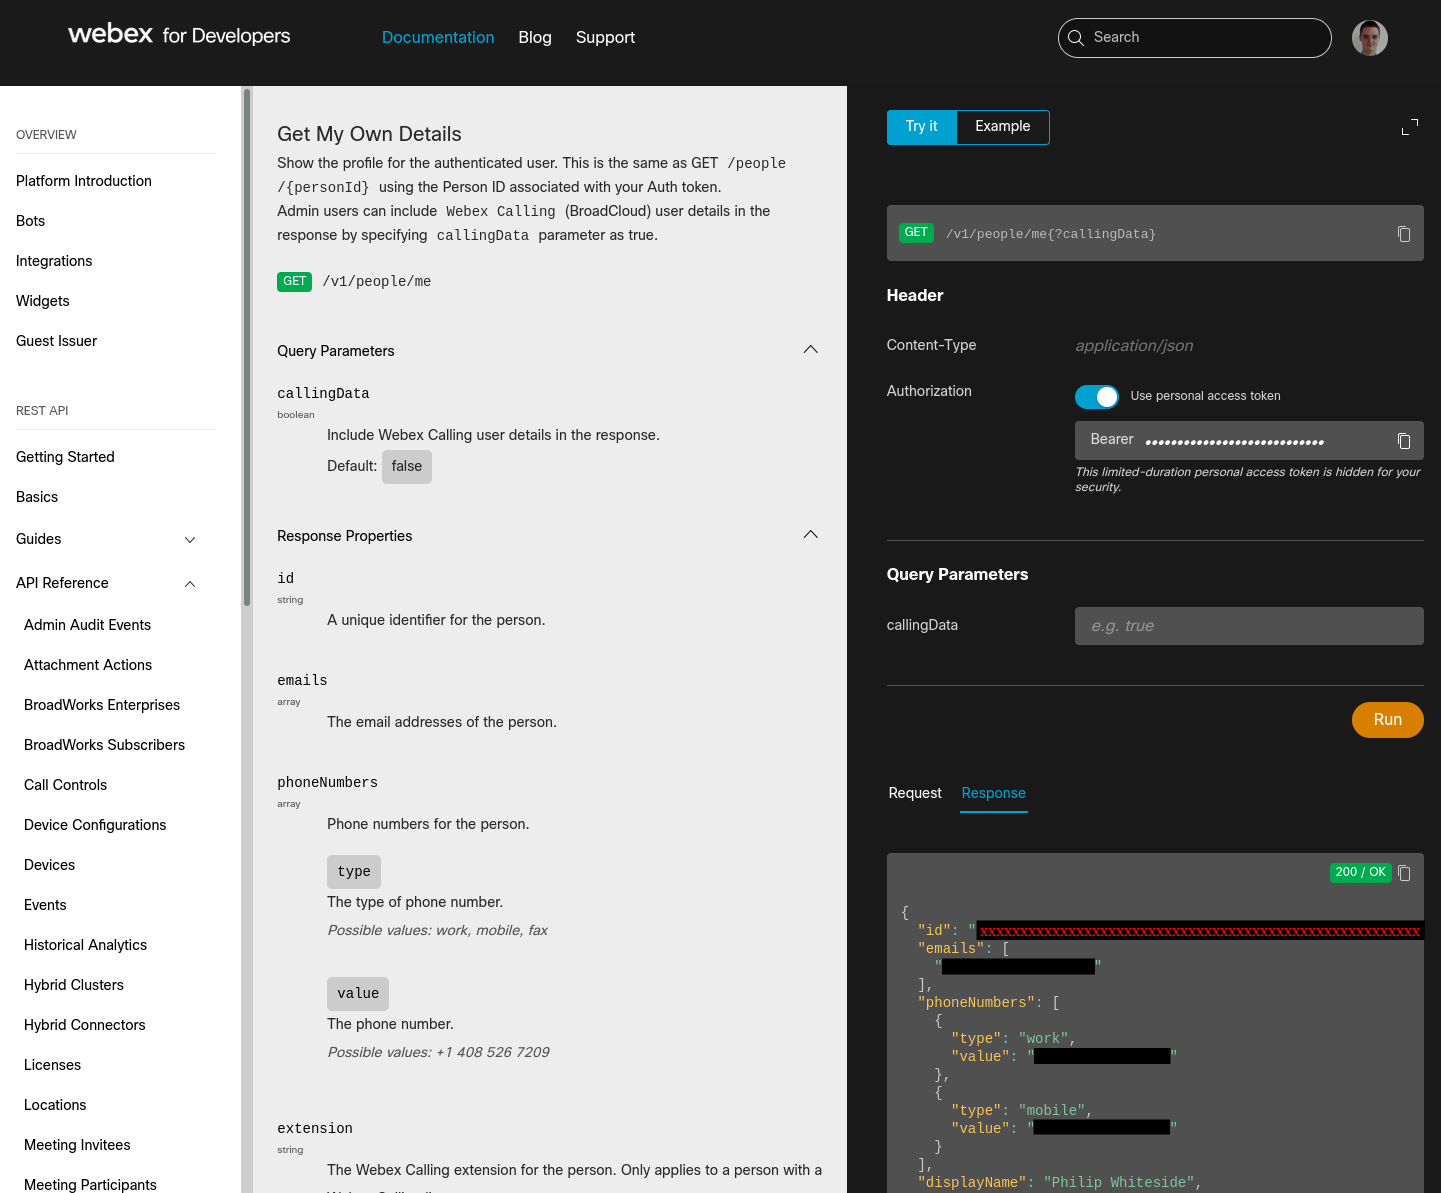
First log into the online API reference for Webex. Here we can query the API very easily and get this ID as well as see the values that our status becomes during various activities. Next head to this specific API reference for Get My Own Details and then from the right hand side “Try it” section click the “Run” button.
This is what you should see after clicking “Run”, the bottom right section will appear, this is the result of your API request. I’ve blocked out my user ID and replaced it with the x's. This is the user ID you want, so copy that somewhere safe now.
Webex API reference, user ID
User Status
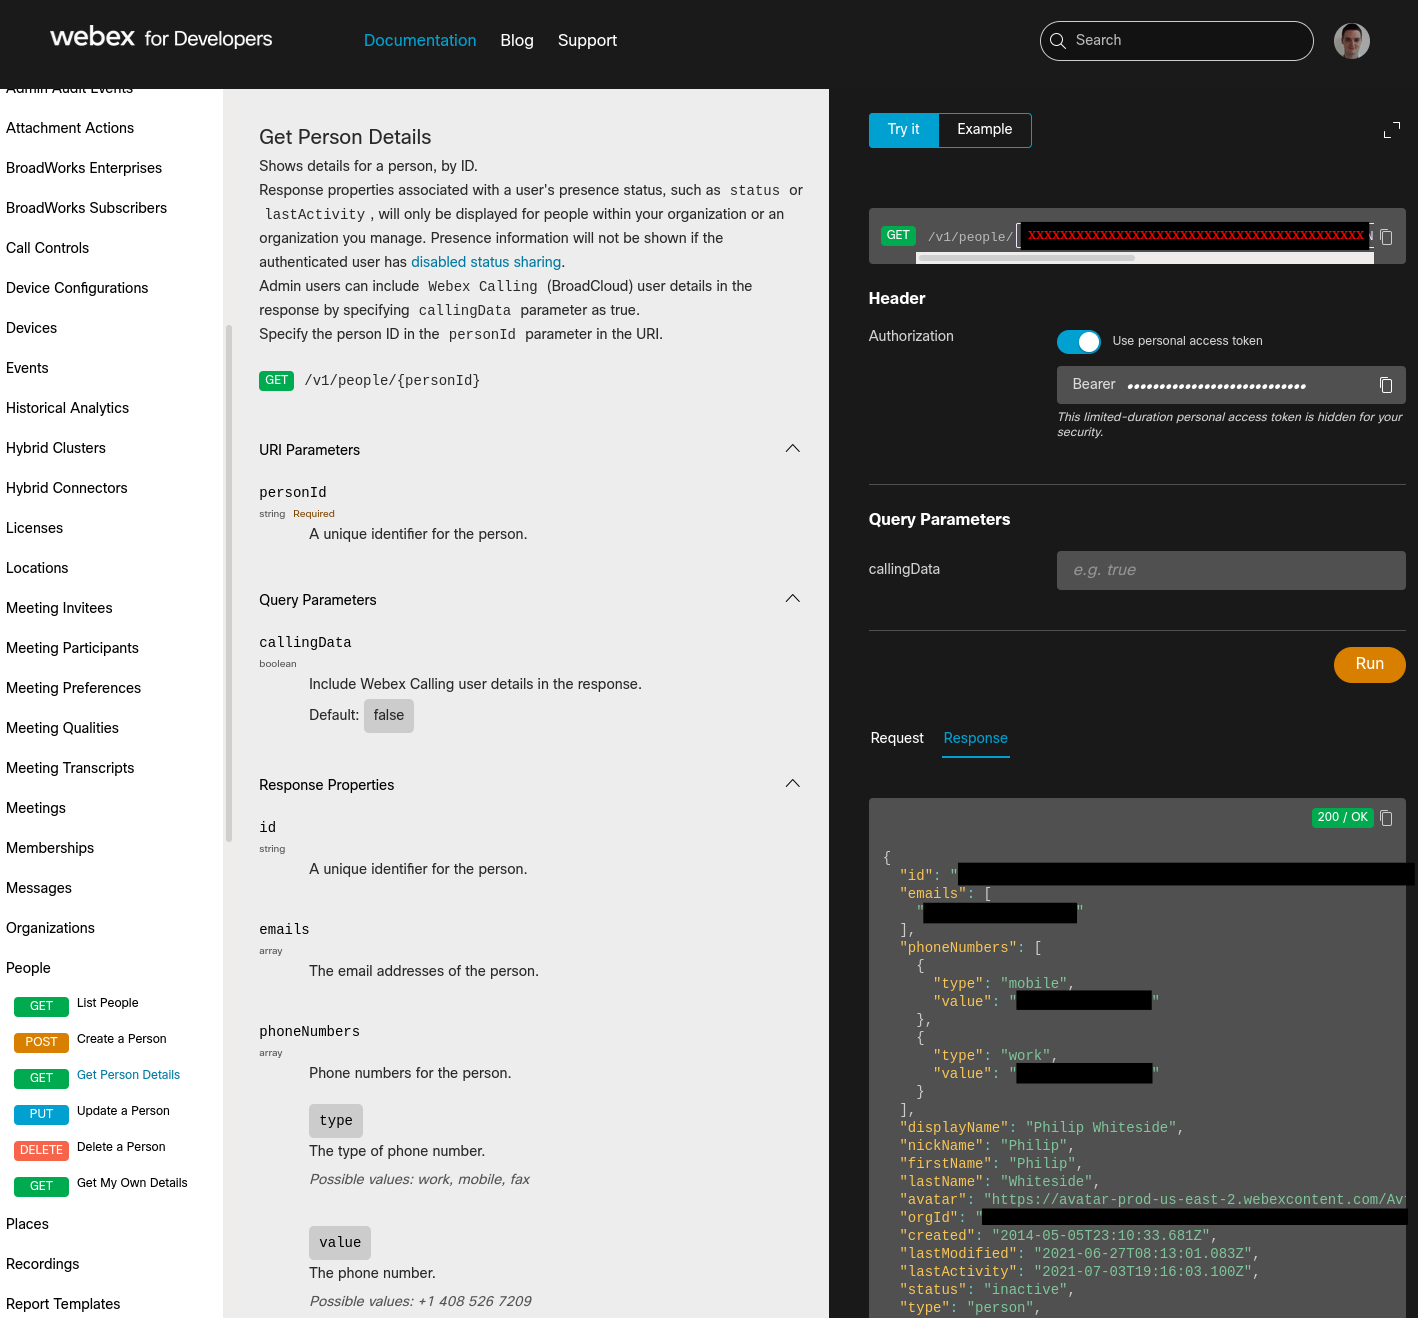
The next piece is to get your status. That output above does have a status field, but that is not the one that we want, at least for me it did not change based on being in a call/meeting or not. Head to the Get Person Details reference and run it again, but this time paste in your user ID where it asks for personID.
This is what you should see. Note the status value is what we are looking for. We don’t need anything from this output, what we have done is proved that our user ID is correct, and we have a verification point of the status if we need to troubleshoot the automation later.
Webex API reference, user status
Authentication
Up until now the online API reference has helpfully entered an authentication key for us automatically. Next we need to generate our own persistent key to use in our own requests outside of this reference. To do this we need to create an “App” token, which will only be used by this setup, and can be removed at any point if your setup is compromised.
Head to the My Apps page and click “Create a New App”. The type of app is a “Bot”. Give the bot a name, a random username, choose one of the default icons, add a description, and finally click “Add Bot”. You will be presented with a your “Bot access token”.
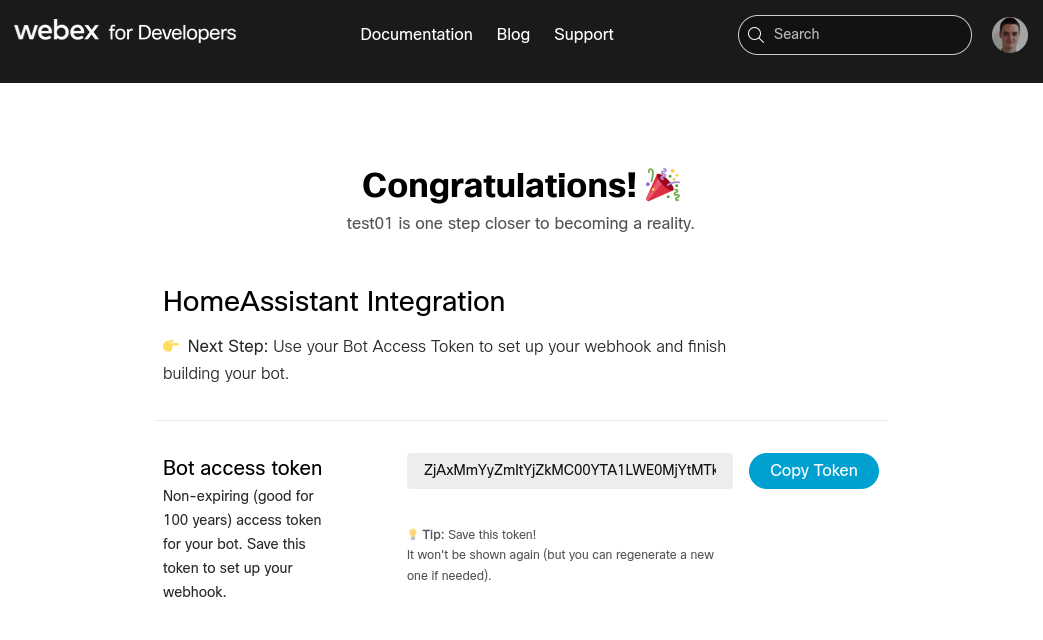
Webex API, bot access token
Home-Assistant Configuration
Sensor Entity
Now that we have both our user ID and access token we can create the sensor within Home-Assistant. The simplest way is to add this to your /config/configuration.yaml file. The sensor element is a top level block, so you can add it to the bottom of your configuration (on a new line). If you already have a sensor block, append the block below to your existing sensor list.
- Replace my
xxxxxxxxxxwith your user ID. - Replace my
yyyyyyyyyywith your access token. - Replace my “Philip Webex Status” with what you want to call this sensor entity.
sensor:
  - platform: rest
    name: Philip Webex Status
    resource: https://webexapis.com/v1/people/xxxxxxxxxxxxxxxxxxxxxxxxxxxxxxxxxxxxxxxx?callingData=false
    headers:
    Authorization: Bearer yyyyyyyyyyyyyyyyyyyyyyyyyyyyyyyyyyyyyyyy
    value_template: '{{value_json.status}}'
    scan_interval: 10
Automation
The final piece to this puzzle is setting up the automations for when the status changes. Now that a sensor exists within Home-Assistant we can complete the setup using the GUI automation editor. We will need 2 automations, 1 for turning on, and 1 for turning off. Doing this in the GUI it makes it very easy to edit the lights chosen and their settings in the future. As for the sensor entity details above they shouldn’t need to be modified.
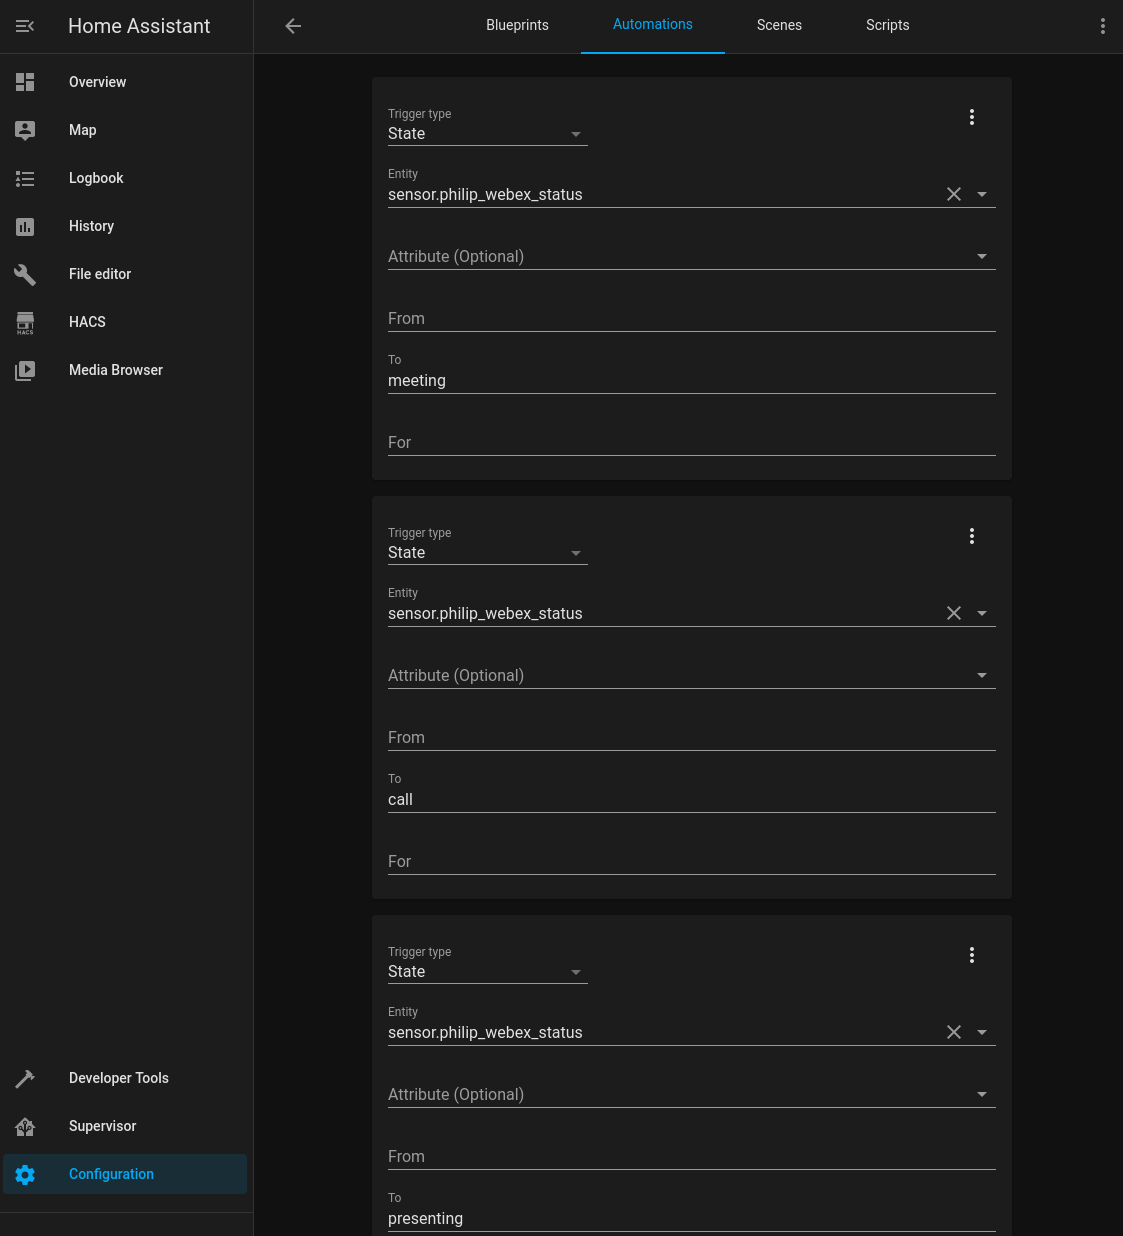
In the GUI create a new automation with 3 triggers. We need 3 triggers as that is the number of states I’ve experienced during a meeting meeting, call, and presenting. Use the following settings for the triggers.
- Trigger Type:
state - Entity:
sensor.philip_webex_status(Yours will match what you called it above) - From: (Leave blank)
- To:
meeting - For: (Leave blank)
Repeat this “Trigger” flock 2 times again with the “To” having a call and presenting. Add in what light you want to turn on with it’s appropriate settings and you’re done for the first automation. For the next automation we want to have the lights turn off after a call/meeting so use the following settings for the triggers.
- Trigger Type:
state - Entity:
sensor.philip_webex_status(Yours will match what you called it above) - From: (Leave blank)
- To:
active - For: (Leave blank)
Repeat this “Trigger” block 2 times again with the “To” having a inactive and DoNotDisturb.
Home-Assistant automation triggers
Conclusion
That’s all there is to cover. In the end the setup is not overly complicated, very easy to maintain, and I’ve not had to make any changes to mine in the many months that I’ve used it. If you’re not a Webex user some aspects will port over to your setup. I hope you find this helpful.
Troubleshooting
If you’re having problems these are the things I would check to try narrow down where something isn’t working/updating and then double check all my configuration around that.
- Does the Webex API work when you don’t use the “User personal access token” and instead use your generated token?
- Get Person Details
- If not, regenerate your bot token and update the configuration to match.
- Does the Webex API status change as it should do?
- Get Person Details
- If not, ensure that you do not block status sharing in your Webex settings and ensure that you are fully in a meeting (not just the loading lobby).
- Does the state of the sensor entity update as it should do?
- URL:
<home-assistant-url>/developertools/state - GUI: Developer Tools > States
- If not, revalidate the sensor entity configuration. Ensure that the entity was loaded by Home-Assistant (if you can find it in the Automations GUI then it does). If not try restarting Home-Assistant, checking the logs for any loading errors.
- URL:
- Does the “Last Triggered” time from the Automations list update when it should do?
- URL:
<home-assistant-url>/config/automation/dashboard - GUI: Configuration > Automations
- If not, check your Automation Triggers are setup correctly and the state they are checking is actually updating.
- URL:
- Does “RUN ACTIONS” button from the Automations list turn the lights on an doff?
- URL:
<home-assistant-url>/config/automation/dashboard - GUI: Configuration > Automations
- If not, check your Automation Actions are setup correctly for the light you want to use.
- URL:
- Does the light work manually from Home-Assistant?
- If not, fix your light setup first.